The randomness of the weather, children, Maths projects and life in general has slowed work on the boat.
I did manage to fit the Centreboard Case Cover, and the Centreboard Pin Covers. The Case Cover was easy. The Pin Covers not so.
It would have taken about 30 seconds to drill the pilot holes for the screws before the Centreboard case was installed in the boat. The Covers are very close to the hull, which is of course angled upwards.
Good luck getting a drill in there, or even a 90 degree adapter for your drill. In the end I used a 45 degree adaptor for a power screwdriver (much smaller) and a drill bit with a Hex Adapter built onto it, and I had to cut the drill bit short.
Then to get the screws in, I used a ratchet screwdriver with the 45 degree adapter. Using a power screwdriver risked making much of the screw head, and getting a messed up screw out from there was not going to be fun.
The first Pin Cover took about 2 hours ! It involved a lot of trial and error. Particularly the error part.
The second, about 20 minutes.
You can get ratchet offset screwdrivers and I see one of these going into my tool kit. Should there be any problem with the CB which required removing the cover, I'd be toast without one.
D
Wednesday, May 18, 2011

Monday, May 02, 2011
Experience is what you get just after you need it.
Or experience is what you get when you do something wrong....
Either way, now, I'm pretty good at dealing with poly-sulphide bedding. Now that the four coamings are in place:
I know that if the tape is too close to the wood for the radius of your bead, then the bedding will be quite thick on the tape and you leave a nice groove when you pull the tape out.
I know that for the brand I used, 5-8 minutes is about right to lift the tape, sooner and it's still to runny. Later and it tears.
I know that you should use 2" masking tape, not 1", as the bedding will surely get out over the 1" tape when you are not paying attention to something.
I know that you should not try to fix any problem once you have lifted the masking tape.
I know all these things now.
It would have made for a better job if I'd known them all at the start.
The unfortunate thing is that reading about these things only helps a little. There is no way to learn that is quite as good as Experience.
Also you will find that the notched spreaders used for spreading tiling cement are prefect for spreading bedding compound.
You can get them for close to nothing, which is good, 'cause I for one would not want to try to clean the poly-sulphide off them.
What was that old line? Son, if you're going to insist on making all your own mistakes, you'd better get cracking, you have a lot of work to do.
Either way, now, I'm pretty good at dealing with poly-sulphide bedding. Now that the four coamings are in place:
I know that if the tape is too close to the wood for the radius of your bead, then the bedding will be quite thick on the tape and you leave a nice groove when you pull the tape out.
I know that for the brand I used, 5-8 minutes is about right to lift the tape, sooner and it's still to runny. Later and it tears.
I know that you should use 2" masking tape, not 1", as the bedding will surely get out over the 1" tape when you are not paying attention to something.
I know that you should not try to fix any problem once you have lifted the masking tape.
I know all these things now.
It would have made for a better job if I'd known them all at the start.
The unfortunate thing is that reading about these things only helps a little. There is no way to learn that is quite as good as Experience.
Also you will find that the notched spreaders used for spreading tiling cement are prefect for spreading bedding compound.
You can get them for close to nothing, which is good, 'cause I for one would not want to try to clean the poly-sulphide off them.
What was that old line? Son, if you're going to insist on making all your own mistakes, you'd better get cracking, you have a lot of work to do.
Monday, April 25, 2011
Sails Up

To figure out exacly where the boom needs to be attached, you need to raise the Main Sail.

And to figure out where the jibsheet leads need to go, you need to raise the Jib.
It helps that there was virtually no breeze once it started to get dark.
A splash in June looks at least credible now.

The mast is Up
 With a little help from my supervisor.
 I managed to get the mast upright.
 And I made up the wire stays in place.
It all worked quite well.
But it could do with a little varnish I guess.
Sunday, April 24, 2011
Awkward big feckin' stick
My first attempt to step the mast ended rather quickly when I realised I had no way of stopping it from swaying from side to side. It was a bare inch out of the bracket when it became obvious that disaster was beckoning.
For all the remaining lifts, I moved car more than 20' away from the boat !!!
I used a 4 part block and tackle and a 5' gin pole to give me leverage.
Round 2 involved putting 2 dead eyes into the deck. (Since the mast base is over a beam, the dead eyes are screwed into oak, with 1 1/2" screws (ie they ain't coming out any time soon). A pair of tangs about 6' up and some 8mm double braid sorted out the whole side to side thing.
For any such braces, they must be attached in line with the point where the mast pivots.
My second attempt left me realising that a certain amount of give in the two mini side stays would help a lot.
Eventually after a lot of raising and lowering I had the mast approximately vertical, and in it's step.
The step suffers quite badly from the whole operation, I see the need for some form of pivot.
I used some light rope as temporary stays until I get the wire ones sized. But I am now a little concerned about how I would adjust the side stays with a 20' mast hanging out of them.
I am leaning away from peg and pin adjusters to just using good old fashion lashings which can be infinitely adjusted, and can be loosened or tightened without disconnecting them.
Photos will follow, hopefully of a vertical mast, rather than a scene of devastation.
For all the remaining lifts, I moved car more than 20' away from the boat !!!
I used a 4 part block and tackle and a 5' gin pole to give me leverage.
Round 2 involved putting 2 dead eyes into the deck. (Since the mast base is over a beam, the dead eyes are screwed into oak, with 1 1/2" screws (ie they ain't coming out any time soon). A pair of tangs about 6' up and some 8mm double braid sorted out the whole side to side thing.
For any such braces, they must be attached in line with the point where the mast pivots.
My second attempt left me realising that a certain amount of give in the two mini side stays would help a lot.
Eventually after a lot of raising and lowering I had the mast approximately vertical, and in it's step.
The step suffers quite badly from the whole operation, I see the need for some form of pivot.
I used some light rope as temporary stays until I get the wire ones sized. But I am now a little concerned about how I would adjust the side stays with a 20' mast hanging out of them.
I am leaning away from peg and pin adjusters to just using good old fashion lashings which can be infinitely adjusted, and can be loosened or tightened without disconnecting them.
Photos will follow, hopefully of a vertical mast, rather than a scene of devastation.
Saturday, April 16, 2011
A mast Step...
 I made up a mast step. It's just half lapped joins, on a plywood base. The plywood is mostly just to give it an extra 1/4" of height, but the alternating grain won't hurt the strength of the step. I thought it turned out quite well.
Wednesday, April 13, 2011
Ticking them off
The todo items that is
Varnishing a 20' long mast out of doors is going to require a little bit of thought...
- Glue the mast
- Plane the mast after gluing and & Round the corners
- Sand the mast
- install the hardware
- rudder fittings need bedding
- standing rigging
Varnishing a 20' long mast out of doors is going to require a little bit of thought...
Wednesday, April 06, 2011
Plaining the Mast
When you glue up a pair of 20' long sticks to make a mast, there's going to be a bit of work with a plane to be done afterwards.
You could use a Power Planer, except that :
It does have a Hock Blade, (a +4 sharpness modifier).
And I have gotten to the stage where I can sharpen and hone a blade to the point of shaving with it.
You'd be surprised at the difference this makes.
After about 2 hours, swapping between each arm, and alternating between pushing the plane, and pulling it Japanese Style I now have a mast which would no longer looks like builders waste.
That may be an easy task for a Full Time Carpenter, but a 2 hour workout (with breaks to hone the blade) is a lot for a guy who pushes keys for a living.
One thing to note:
Every time I honed the blade, I thought "damn, I should have done that 10 minutes ago".
However, as you need to take off the Plane Iron Cap to sharpen / hone, you need to reset the blade each time.
To reset the blade, put the plane down on a flat wooden surface, put the blade into the plane but do not clamp it. Adjust it so that it's resting on the wood. Push it gently down into the wood with your thumb. Clamp the blade. Now that the blade is more or less in the right place it's just fine tuning.
You could use a Power Planer, except that :
- It's noisy
- You have to wear Ear Protection.
- You can't listen to music.
- It makes a mess (dust and chippings by the bin load).
- The wood dust means you need to wear a mask.
- And the dust gets right into your very soul.
- Your neighbours won't feel the love if you fire up a power planer in the late evening.
- Power Planers are about as subtle as a Felling Axe.
It does have a Hock Blade, (a +4 sharpness modifier).
And I have gotten to the stage where I can sharpen and hone a blade to the point of shaving with it.
You'd be surprised at the difference this makes.
After about 2 hours, swapping between each arm, and alternating between pushing the plane, and pulling it Japanese Style I now have a mast which would no longer looks like builders waste.
That may be an easy task for a Full Time Carpenter, but a 2 hour workout (with breaks to hone the blade) is a lot for a guy who pushes keys for a living.
One thing to note:
Everyone says it 'cause it's true: sharpen more often.
Every time I honed the blade, I thought "damn, I should have done that 10 minutes ago".
However, as you need to take off the Plane Iron Cap to sharpen / hone, you need to reset the blade each time.
To reset the blade, put the plane down on a flat wooden surface, put the blade into the plane but do not clamp it. Adjust it so that it's resting on the wood. Push it gently down into the wood with your thumb. Clamp the blade. Now that the blade is more or less in the right place it's just fine tuning.
Thursday, March 24, 2011
Thoughts on 5 years of building a boat....
Someone asked me recently if I'd gotten what I wanted out of building my boat.....
I could have just bought a second hand dinghy for a couple of grand, less than I've spent in tools, materials, etc.
But I wanted to build a boat.
It's taken 5 years, and now it's nearly finished.
I could have played golf, and now I'd have a nothing but pitiful handicap and a load of expensive sticks to show for it. And as someone pointed out on one of the forums, it would still have taken me 5 years not to build it.
It has taken up a lot of my free time. (and time that really was not so free)
Yes, but I could have spent the time watching TV instead. But I grew up watching "Why Don't You?"
so I did.
Soon I'll get to put up the mast and see the sails up.
Then a little while later, I'll get to float it.
I'm looking forward to that.
There's lots of things I would change, now that I have the experience that I needed when I started. But I wouldn't go back and not build it.
Thanks Caroline, for putting up with me, and for giving me the time to do this. I could not have done it without your support. You may not have turned a single screw, or cut a single piece of wood, but this boat would not be here without your support. I'd have given up and used it for firewood a long time ago without you.
Dave
I could have just bought a second hand dinghy for a couple of grand, less than I've spent in tools, materials, etc.
But I wanted to build a boat.
It's taken 5 years, and now it's nearly finished.
I could have played golf, and now I'd have a nothing but pitiful handicap and a load of expensive sticks to show for it. And as someone pointed out on one of the forums, it would still have taken me 5 years not to build it.
It has taken up a lot of my free time. (and time that really was not so free)
Yes, but I could have spent the time watching TV instead. But I grew up watching "Why Don't You?"
so I did.
Soon I'll get to put up the mast and see the sails up.
Then a little while later, I'll get to float it.
I'm looking forward to that.
There's lots of things I would change, now that I have the experience that I needed when I started. But I wouldn't go back and not build it.
Thanks Caroline, for putting up with me, and for giving me the time to do this. I could not have done it without your support. You may not have turned a single screw, or cut a single piece of wood, but this boat would not be here without your support. I'd have given up and used it for firewood a long time ago without you.
Dave
Tuesday, March 22, 2011
ToDo List
The pieces for the mast are cut, but still have to
- Glue the mast
- Plane the mast after gluing and & Round the corners
- Sand the mast
- Install sail tracks.
- Varnish the mast
- Varnish the boom
- 1 panel of the hull still needs glassing
- Paint the hull
- install the hardware
- rudder fittings need bedding
- standing rigging
- running rigging
- various cleats
- Install Centreboard Case Cover
- Buoyancy bags
- Add some form of rubbing strip where the deck joins the hull
So I should be in the water this year !!
Coamings & Paint

At least there's paint on the deck now, and coamings cut and clamped in place.

They look pretty good, for an amatuer.

Any my new temporary boat tent, so that I can paint the boat.
Friday, March 11, 2011
Just one thing.....
When you are tired, it's hard to get motivated to go out and work on the boat. The TV and the Couch beckon, and you can "flop and veg".
But if there's just one little thing that you can do in the shed, that gets you out there. So last night I cut a set of bolts to size, drilled out the countersunk holes in the cleats, made up backing pads for the cleats, drilled out a whole pile of washers. (I bought a box of 100 stainless washers, but I got the smallest size. I can drill them out if I need larger. Buying a pack of 5 of them costs nearly as much as a box of 100)
In the end, out of a tired evening when I might have simply flicked through the stuff that passes for entertainment, (The Boss, 57 channels and nothing on), I moved another little step closer to launch day.
But if there's just one little thing that you can do in the shed, that gets you out there. So last night I cut a set of bolts to size, drilled out the countersunk holes in the cleats, made up backing pads for the cleats, drilled out a whole pile of washers. (I bought a box of 100 stainless washers, but I got the smallest size. I can drill them out if I need larger. Buying a pack of 5 of them costs nearly as much as a box of 100)
In the end, out of a tired evening when I might have simply flicked through the stuff that passes for entertainment, (The Boss, 57 channels and nothing on), I moved another little step closer to launch day.
Sunday, February 27, 2011
How the floorboards are held down....
I was asked how the floorboards are held down....
There's a Jamb Cleat on the frame, and a wooden "hook" on the underside of the floorboard.
The cord goes up behind the hook, around the bottom of the jamb cleat, around the cleat and pull.
You can see in the second picture, the Jamb Cleat is simply a piece of wood cut so that where it meets the oak frame, it makes a very narrow triangular gap. As the cord is pulled tight, it traps itself.
Simple as that. There may be better ways, but that's cheap, and it works.


There's a Jamb Cleat on the frame, and a wooden "hook" on the underside of the floorboard.
The cord goes up behind the hook, around the bottom of the jamb cleat, around the cleat and pull.
You can see in the second picture, the Jamb Cleat is simply a piece of wood cut so that where it meets the oak frame, it makes a very narrow triangular gap. As the cord is pulled tight, it traps itself.
Simple as that. There may be better ways, but that's cheap, and it works.


Monday, February 07, 2011
Cleat Envy
Ok, the first attempt at cleats were functional, but frankly, ugly.

A quick post to http://forum.woodenboat.com/ and I have a much better Idea of what I wanted.
Longer bases, for strength, lower, and more rounded.


A quick post to http://forum.woodenboat.com/ and I have a much better Idea of what I wanted.
Longer bases, for strength, lower, and more rounded.
Sunday, February 06, 2011
A simple cut off saw.
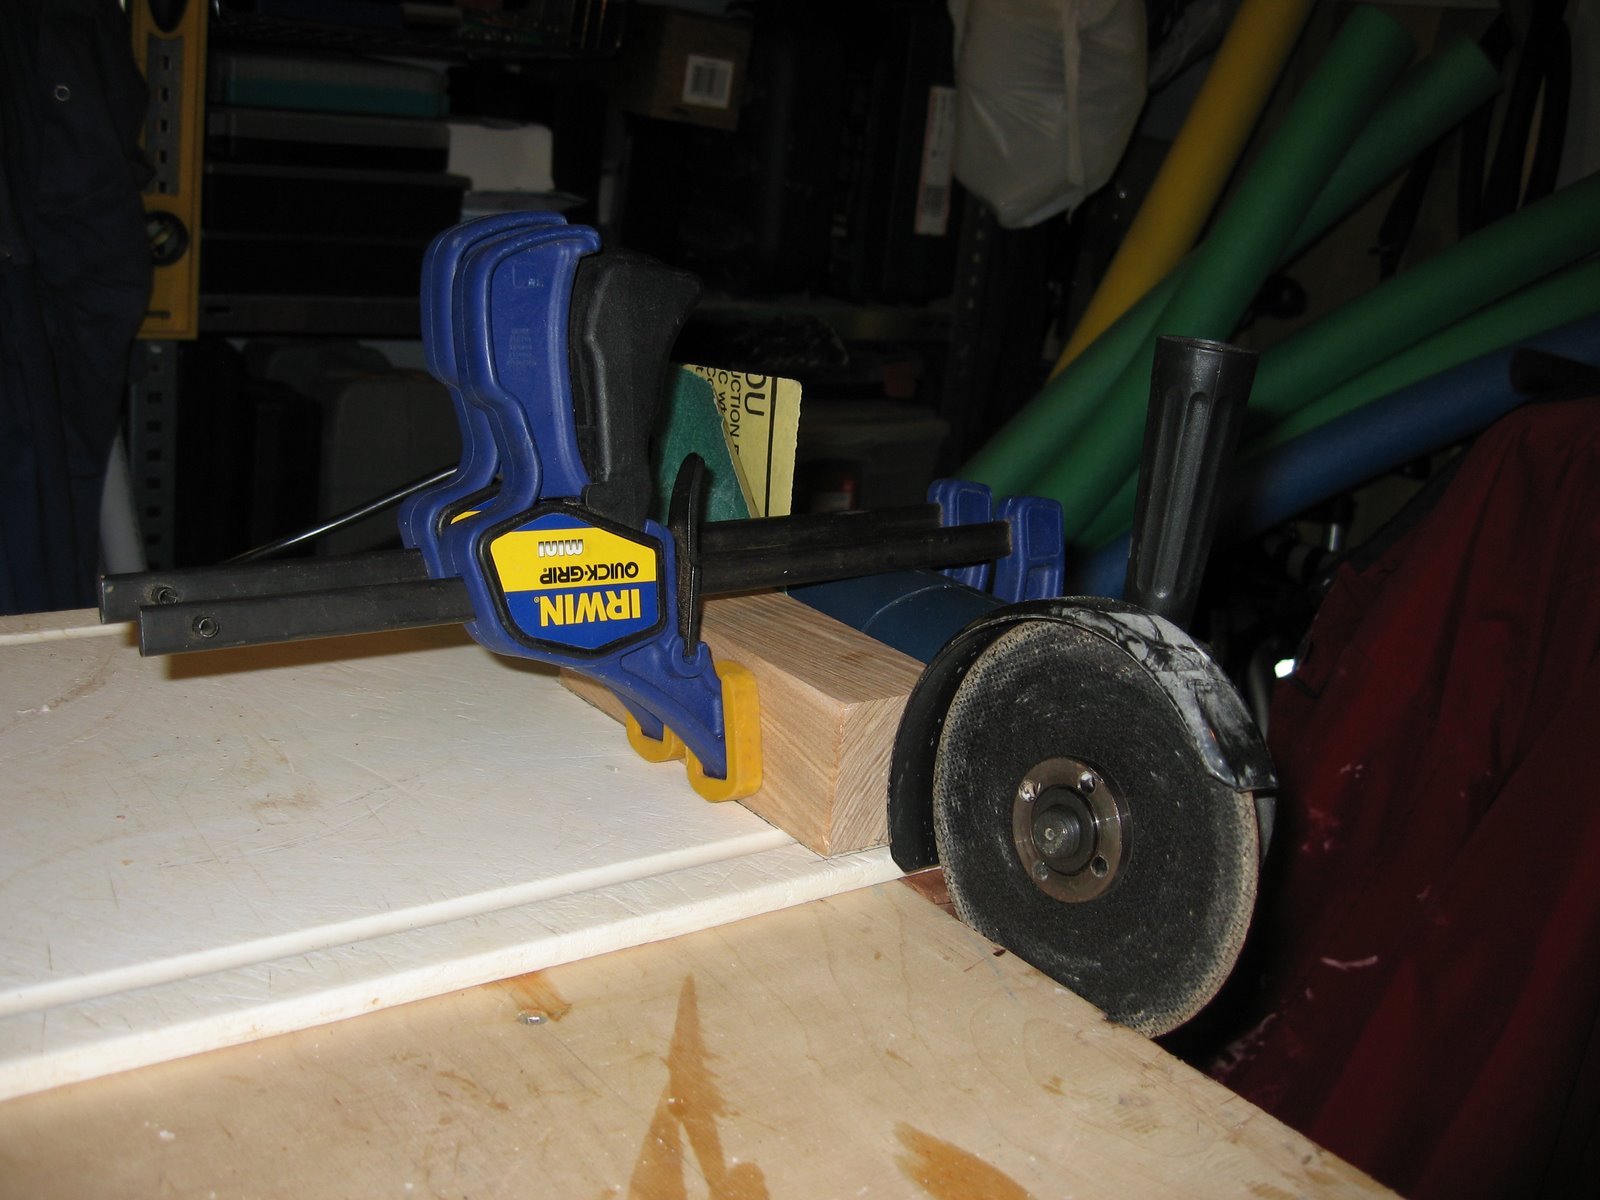

Since I don't really need a metal cut off saw all that often, and I have little room for more tools, I cobbled this together. It's just an angle grinder, and a sled. The sled is constrained by runners, so it moves in a straight line.
The Cutting blade is close enough to square to the table for my purposes.
I tried it out by cutting a hollow steel rod at 45 degrees, and then flipping the parts to join them at 90 degrees. It works just fine.
Yes, that is an old bread board.
Sunday, January 23, 2011
The Coamings

So I have started working on the Coamings. I can't claim the carving, I tried some smaller work, and it came out fine, but my practice pieces on larger letters were less consistent. So I sent the coaming to Wood Graphics Ireland who did a nice job.
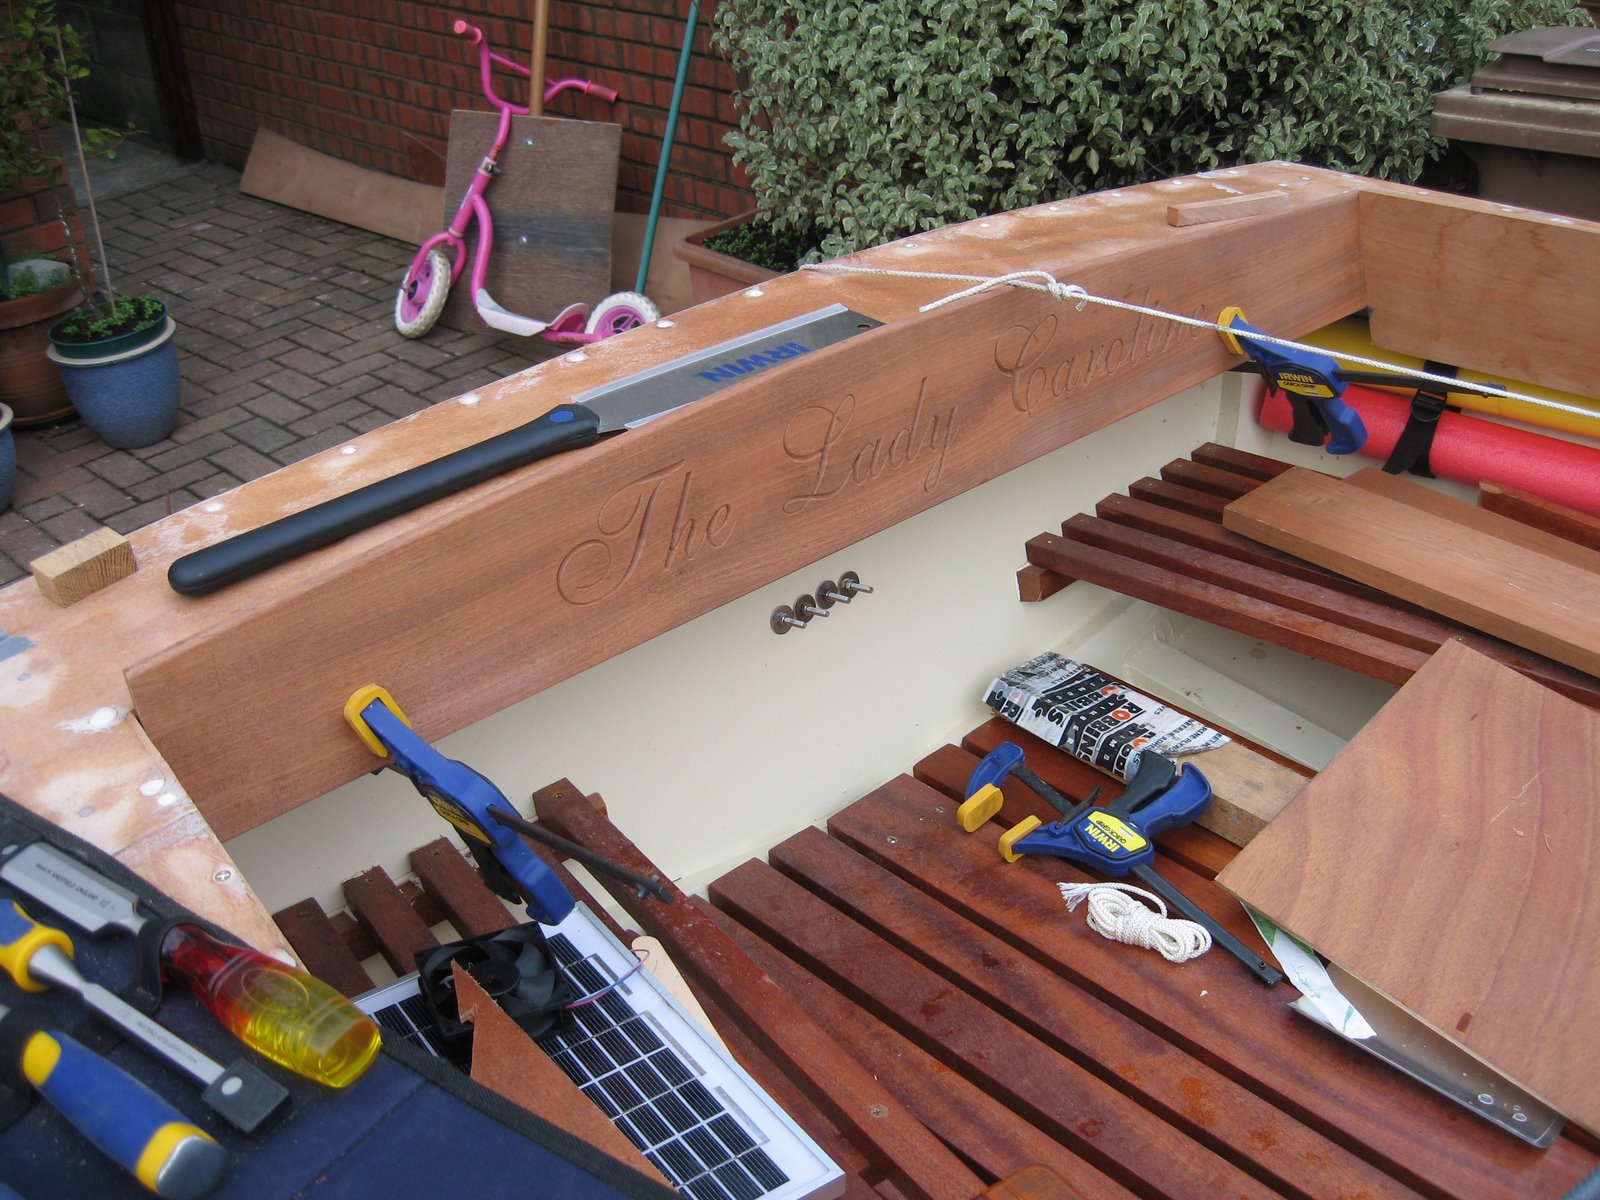
Of course cutting to fit is a job and a half, since you have compound angles and a curve.

But I need to figure out how to join the ends
Sunday, January 16, 2011
Making More Cleats

You can see the blanks here, the curves are cut on a drill stand with a 20mm Forstner bit. ThenI cut the horns before putting a 1/12 slope on each side. Of course, with my new found confidence, I made the base a little too short, but since they are for a 14' sailing dinghy, they should cope ok.

A rasp and a belt sander clamped upside down on a table with an 80 grit belt will do most of the shaping, and then you cut strips of a sanding belt and do the insides of the curve shoe shiner fashion.
Friday, January 14, 2011
Making Cleats

Ok, so it took about 2 hours to make this, and it turned out a little thin on top. But since it's only going to hold the centerboard pennant, it should be fine.

Now that I have an Idea what I am doing, I think I will be able to churn one out in about 15 minutes.
- A simple guide on the drill press means I can cut the holes for the curves without carefully measuring each block.
- The order of cutting on the bandsaw is all important when some of the cuts are not at 90 degrees.
- It's a lot easier to round the end of the cleat on a sander than on a bandsaw.
- When you are joining a curve (20mm drill bit) and a straight line, don't try for a perfect tangent, cut inside the tangent, tidy up with sandpaper or a file.
It is still hard to explain why I spent all that time, instead of just buying a half a dozen nylon ones. At least it's hard to explain to some people.
Monday, January 03, 2011

Sunday, January 02, 2011
Tool Maker
All I needed was a 3/8" drill bit, about 2" long, and with a 1/4" hex fitting on the end. You see I could not get a drill in to the gap, so I'd have to use a ratchet with a hex drive.
No problem, I have lots of long drill bits, lots of screwdriver bits, a grinder with a cutting wheel, a Propane/Butane torch (1610ºc / 2930ºf), and some brazing wire.
I chopped the drill bit short, chopped off the end of the screwdriver bit, covered the joint in flux, and cooked it a little. The brazing wire melted and slurped into the joint just like in the videos on you-tube, and suddenly I had a 2" drill bit with a hex drive. Not the prettiest joint in the world, and I doubt it would hold up to much abuse, but it was good enough to drill a hole by hand.
10 minutes later, I had the hole sorted out in the Centerboard case for the pin. And after a little playing about, I had the Centerboard mounted.
Progress at last.
No problem, I have lots of long drill bits, lots of screwdriver bits, a grinder with a cutting wheel, a Propane/Butane torch (1610ºc / 2930ºf), and some brazing wire.
I chopped the drill bit short, chopped off the end of the screwdriver bit, covered the joint in flux, and cooked it a little. The brazing wire melted and slurped into the joint just like in the videos on you-tube, and suddenly I had a 2" drill bit with a hex drive. Not the prettiest joint in the world, and I doubt it would hold up to much abuse, but it was good enough to drill a hole by hand.
10 minutes later, I had the hole sorted out in the Centerboard case for the pin. And after a little playing about, I had the Centerboard mounted.
Progress at last.
Subscribe to:
Posts (Atom)