You know, in spit of reading Steve Henry's advice on the GlenL Forums, I went and built the scaffold and then looked at the the frame sitting by the wall and thought "Ah fiddlesticks*, Steve warned me not to do that.".
One of the frames has a cross piece and needs to be in place before you screw the scaffold together. A little bit of dissasembly followed.
I now have a scaffold, the transom is mounted, one frame is on the scaffold. I need another good sunday to position the frames properly. Then we get our kitchen back.
I built the scaffold about 6 inches higher than the diagram, to make it easier to work on.
I suspect that I will need to shim some of the frames to make sure that everything is level, since there are a few individualities in them, but that should be easy enough.
Pic's will follow once I have all the frames set up.
* "Fiddlesticks" may not have been the exact word that came to mind.
Showing posts with label frames. Show all posts
Showing posts with label frames. Show all posts
Monday, January 28, 2008

Monday, August 27, 2007
Laminated Deck Beams....
I went to my wood pile, to find a peice of oak for the last deck beam.
1" x 4" x 6'.
The longest "piece" I had was about 5' 4". Or I could cut into the lovely 16' plank that I had intended for the sheer clamps.
Maybe I could laminate up a plank. After all, this is going to be supported by a post in the middle. And glue is stronger than wood. And.. And..
I have cut a whole set of 1" x 1" strips, and most of them 5' 4" long, and staggered the joints so that when I cut it to shape, and cut the notches I should not have any weak points.
The whole lot is glues up with Balcotan PU - which does not stick to Cling Film / Plastic Wrap - and clamped with about 30 F-clamps.
It's sitting in my garden shed, awaiting a bounce test.
I reckon that if I can put a block under each end and it will support my 200lbs bouncing up and down on it, then it should be good.
It is for a 14' sail boat, not an ocean going clipper....
Any thoughts or comments.
1" x 4" x 6'.
The longest "piece" I had was about 5' 4". Or I could cut into the lovely 16' plank that I had intended for the sheer clamps.
Maybe I could laminate up a plank. After all, this is going to be supported by a post in the middle. And glue is stronger than wood. And.. And..
I have cut a whole set of 1" x 1" strips, and most of them 5' 4" long, and staggered the joints so that when I cut it to shape, and cut the notches I should not have any weak points.
The whole lot is glues up with Balcotan PU - which does not stick to Cling Film / Plastic Wrap - and clamped with about 30 F-clamps.
It's sitting in my garden shed, awaiting a bounce test.
I reckon that if I can put a block under each end and it will support my 200lbs bouncing up and down on it, then it should be good.
It is for a 14' sail boat, not an ocean going clipper....
Any thoughts or comments.
Short cuts seldom are....
They said draw out the full frame on a board, and use that for gluing up the frames. No worries, I'll just size up each half against the plans and glue up each half. How can it go wrong....
When I look at the two half, one is just about perfect, the other is off by about 5/16" at the top.
The three other frames where I did as I was told, and drew them out on a board, and then glued them up are just fine.
Now I am faced with - re cut and re glue or shim and trim.
I suspect I will shim and trim.
Since the side beam of the fram is 1" thick oak, and three inches from outside to inside, trimming 5/16" off the inside, and adding a 5/16" strip to the outside should be fine. The added strip will be under compression, and I suspect much of if may get faired away anyhow.
More haste less speed.
When I look at the two half, one is just about perfect, the other is off by about 5/16" at the top.
The three other frames where I did as I was told, and drew them out on a board, and then glued them up are just fine.
Now I am faced with - re cut and re glue or shim and trim.
I suspect I will shim and trim.
Since the side beam of the fram is 1" thick oak, and three inches from outside to inside, trimming 5/16" off the inside, and adding a 5/16" strip to the outside should be fine. The added strip will be under compression, and I suspect much of if may get faired away anyhow.
More haste less speed.
Monday, March 26, 2007
Progress
 I know the photo looks like the logo for kids space toy, but to me it's progress.
This weekend I managed to cut all of the 4th Frame. Now I have the transom, Frames 1, 2 and 4. I'm mising frame 3 as I did not have a clean peice of Oak large enough for the cross beam. Frame 3 is next.
(The cross beam on Frame 4 is left long for fitting.)
Once that is complete, I have to get some marine ply for the gussets and for the stem.
And for the Centerboard.
Then there's the keel. That is a 5/4" * 4" * 12' Oak board, and Brookes only sell 9' boards. I think there's a little bit of work with the phone book in my near future.
Saturday, March 10, 2007
Planing Oak
I actually got some work don on the boat today. I took some of my rough Oak boards and planed planed and thicknessed them ready to mark and cut Frame and Frame 4.
It takes a lot of passes to get the cup out of the boards, but at least I can record the exact setting of the thicknessor so that each piece is the same thickness.
When running 7 inch wide oak through the thicknessor (A Woodster pt85) I can turn the handle about 1/8 of a turn each pass, and take off about 1/4 mm. Any more and the machine grinds to a halt. (Previous Posts)
I guess it is a little unfair asking a hobby machine to deal with 7" wide oak boards. But if I go slowly it copes. The finish would drive a cabinet maker to drink, but then I'm making a boat to sail, not to stare at.
I've sort of decided to redo the transom frame. Now that I have a table saw I reckon I can do a better job of the bevels. But that's another day.
I set up the table saw fully last night. The Easiest way of getting the side extension tables level with the main table is to take off the guard, lower the blade right inside the saw, flip it upside down on a large table and attach the side extensions there. They cannot but be level with the saw table. Worked a treat.
The forecast is poor for tomorrow, so I will probably settle for simply marking out the frames and then try to cut them after work during the week.
D
It takes a lot of passes to get the cup out of the boards, but at least I can record the exact setting of the thicknessor so that each piece is the same thickness.
When running 7 inch wide oak through the thicknessor (A Woodster pt85) I can turn the handle about 1/8 of a turn each pass, and take off about 1/4 mm. Any more and the machine grinds to a halt. (Previous Posts)
I guess it is a little unfair asking a hobby machine to deal with 7" wide oak boards. But if I go slowly it copes. The finish would drive a cabinet maker to drink, but then I'm making a boat to sail, not to stare at.
I've sort of decided to redo the transom frame. Now that I have a table saw I reckon I can do a better job of the bevels. But that's another day.
I set up the table saw fully last night. The Easiest way of getting the side extension tables level with the main table is to take off the guard, lower the blade right inside the saw, flip it upside down on a large table and attach the side extensions there. They cannot but be level with the saw table. Worked a treat.
The forecast is poor for tomorrow, so I will probably settle for simply marking out the frames and then try to cut them after work during the week.
D
Sunday, December 31, 2006
Read the plans CAREFULLY.

There's nothing quite like the realisation that the piece of wood you have spent so much time on is just plain wrong. You know the sort of thing, cutting two left hand side pieces.
The little section in marked in red in the bottom left is actually part of the side piece. I read the plans as if it were a chine, or longitudinal member. So now I have two side pieces which are each about an inch short.
Oh well. It's all learning and practice I suppose.
The plans for the boat come from Glen L.
Sunday, November 26, 2006
A new frame...
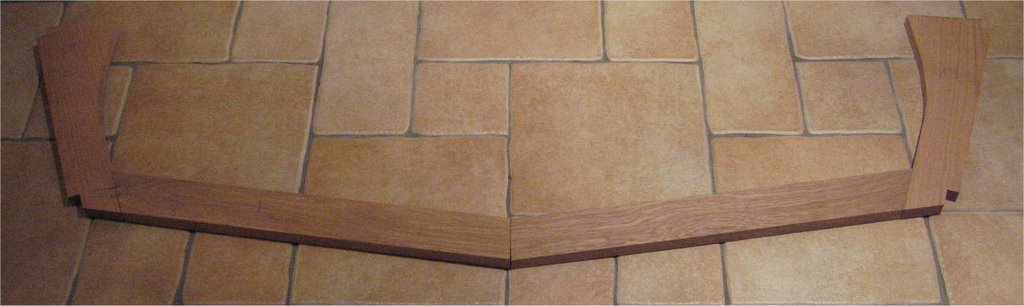
This weekend I tried a simpler frame. Frame 1 has no bevels pre-cut. If you look closely, you will see that the two bottom parts have not been fitted correctly at the center yet. That's another days work. By the way, sorry about the quality of the photo, my sis has borrowed my DSLR for a trip to South Africa, so I took this with an Ixus. Nice Camera for snapshots, but you can hardly set up remote triggered flashes. I'll retake it with a more contrasting background when I get my camera back.

This time I cut the joints away from the mark and fitted them with a Stanley Bailey Block Plane. Using the ScarySharp method for sharpening; progressively finer silicon carbide papers and a glass plate.
I was able shave paper thin slivers from the end grain of an Oak Plank. Then suddenly as if by magic (well with a little bit of work), bits that are supposed to fit together do.
I have still to "fit" the join at the center, but I need to draw the frame out on a large plywood board to ensure I have the angles right.
Tuesday, November 07, 2006
Tracing Frames - inch by inch / Sapwood
The real world has been intervening as I have finally gotten around to breaking out the first row of tiles around the bath, removing the old seal, replacing the seal, and replacing the first row of tiles.
However I have made a little more progress on the boat, in that I have transferred the plans for the transom frames onto oak, ready for cutting tomorrow after work.
Unfortunately I have also found that one of the oak planks that I bought is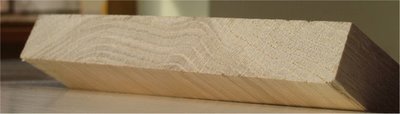 almost 60% sapwood. I reckon that I can get about 2 inches down the middle of good wood out of it. Luckily, I only bought a few planks, as I knew I did not really know what I was looking for. Though I have been told that spotting sapwood in unplaned oak can be tough at the best of times.
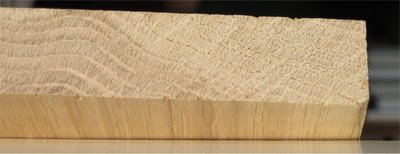
Some days are good days, some days are less so.
I have ordered a set of roof bars for the car, so that I can carry longer planks, and I will be heading down to lisnavagh to see what they have in stock.
However I have made a little more progress on the boat, in that I have transferred the plans for the transom frames onto oak, ready for cutting tomorrow after work.
Unfortunately I have also found that one of the oak planks that I bought is
 almost 60% sapwood. I reckon that I can get about 2 inches down the middle of good wood out of it. Luckily, I only bought a few planks, as I knew I did not really know what I was looking for. Though I have been told that spotting sapwood in unplaned oak can be tough at the best of times.
Some days are good days, some days are less so.
I have ordered a set of roof bars for the car, so that I can carry longer planks, and I will be heading down to lisnavagh to see what they have in stock.
Subscribe to:
Posts (Atom)