In a shop, it's polite to wait until someone finishes a difficult glue up or stops playing with the sharp spinny thing before you interrupt. So I was grateful that the weather showed the same good manners.
I had just finished gluing up the port side (I refer to port and starboard as if I were sitting upside down in the boat, since it is currently upside down. This seems more correct. For absolute Clarity the port side is the side facing out into the garden in the photos) anyhow, as I was saying, I had just glued up the Sheer Clamp, all held in place with waxed deck screws and large washers. I was crouched in the gap between the bushes and the boat, just about to start drilling the holes for the starboard side when I felt a few drops of rain, then a few more, and like Cockroaches and Politicians, where there are one or two, there are always many many more.
Tarpaulin up, tools away and back inside for a hot shower. All the while thanking the polite rain for not disturbing me halfway through the port side, and for not letting me get well started on the starboard.
Incidentally, one very handy tool for boat back garden building is a Garden Kneeling Pad. Basically a piece of durable foam with a built in handle that's just right for kneeling on. Kneel in the cold wet mud, or hard concrete for a while and trimming those last two notches is a whole lot less fun. Get one for feck all + postage on ebay.
Showing posts with label Tools. Show all posts
Showing posts with label Tools. Show all posts
Friday, February 27, 2009

Monday, July 23, 2007
Rain, Interspersed with Heavy Showers and Occasional Drizzle.
I had great plans for this weekend. I long list of things that I was planning on doing. The weather had other plans. This summer has really not been suited to outdoor boatbuilding. It's been best suited to getting on a plane and going somewhere else.
I did get some work done, I had to plane a simple Oak batten to fit between two plywood gussets, The slats for the seats will screw into these battens. Given that I had gone to the trouble of buying some decent blades for my planes and some waterstones and then going to the trouble of reading all about sharpening, I thought I'd leave the Bosch in its box and break out the Stanley.
The blade was sharp, bald patch on my arm sharp. Gillete eat your heart out. I set the plane to take very thin shavings and started. I had to take about 3/16 of an inch off the batten to make it fit, and I had to square it up a little.
Damn, It's hard work. Oak is hard stuff, and I had the "benefit" of trying to do this on a fold up work bench, so I had to use my weight to hold the bench steady and my arms to plane. I gather that with a proper bench you get to use your body weight to do the planing.
I found that Oak will blunt a blade quite quickly, you can feel it getting harder and harder to push the plane, and you find the shavings concertina. This is a good indication that 30 seconds on the waterstone is required, sacrifice some more hair from my arm to the Sharp Gods, and off we go again.
It was a great experience to square and thickness the wood the old fashioned way, but I will admit to dragging out the Bosch in order do the second batten, in about 1/10th of the time.
When you look at pictures of old wooden sailing ships, and think that they didn't have Bosch, Makita, or even Black and Decker, you start to look at them in a different light.
Oh yes, and never try a crushing handshake on someone who actaully uses a hand tools for a living.
I did get some work done, I had to plane a simple Oak batten to fit between two plywood gussets, The slats for the seats will screw into these battens. Given that I had gone to the trouble of buying some decent blades for my planes and some waterstones and then going to the trouble of reading all about sharpening, I thought I'd leave the Bosch in its box and break out the Stanley.
The blade was sharp, bald patch on my arm sharp. Gillete eat your heart out. I set the plane to take very thin shavings and started. I had to take about 3/16 of an inch off the batten to make it fit, and I had to square it up a little.
Damn, It's hard work. Oak is hard stuff, and I had the "benefit" of trying to do this on a fold up work bench, so I had to use my weight to hold the bench steady and my arms to plane. I gather that with a proper bench you get to use your body weight to do the planing.
I found that Oak will blunt a blade quite quickly, you can feel it getting harder and harder to push the plane, and you find the shavings concertina. This is a good indication that 30 seconds on the waterstone is required, sacrifice some more hair from my arm to the Sharp Gods, and off we go again.
It was a great experience to square and thickness the wood the old fashioned way, but I will admit to dragging out the Bosch in order do the second batten, in about 1/10th of the time.
When you look at pictures of old wooden sailing ships, and think that they didn't have Bosch, Makita, or even Black and Decker, you start to look at them in a different light.
Oh yes, and never try a crushing handshake on someone who actaully uses a hand tools for a living.
Wednesday, March 14, 2007
More Planes


I've inherited these from my Grandfather. They look like they've been left on a shelf for quite a while... I guess some clean up is in order...
D
Thursday, February 22, 2007
Trend Grabit
As sure as black cats have black kittens, sooner or later you will strip the head of a screw. hopefully you will have a Trend Grabit around. It's got a reverse cutting drill bit to drill out a hole in the screw, and a reverse threaded cone to dig into the hole and unscrew the screw.
One thing to bear in mind. You do have to drill out a hole in the top of the screw, even thought the screw may appear nicely drilled by your previous attempts to screw it in, the hole that the grabit makes is the correct shape for the threaded cone to grab.
There's a series of pictures here http://www.trendmachinery.co.uk/grabit/
One thing to bear in mind. You do have to drill out a hole in the top of the screw, even thought the screw may appear nicely drilled by your previous attempts to screw it in, the hole that the grabit makes is the correct shape for the threaded cone to grab.
There's a series of pictures here http://www.trendmachinery.co.uk/grabit/
Friday, February 09, 2007
On Power Tools
How woodwork has changed since the time of my grandfather. He would have cut lap joints with a saw and pared them to an exact fit with a small rabbet plane. The process would have taken less time for him, with his years of experience, but would still take more than a few moments.
Finding my collection of power tools expanding beyond the space to store them in my back yard shed, I was faced with obtaining a half height tool shed to place in some space under the kitchen window. Unable to find one to suit, I thought – I’ll build one.
In making the frames I needed to cut some lap joints. Since I was working in rough treated timber, a rough lap joint was more than adequate, so out came the Black and Becker Router.
I set up a batten to guide the router on a scrap price, and this gave me a marker for how far from the batten the cut would be.
I set the router depth to approximately half the thickness of the wood, and a few moments later I had half the lap joints cut.

In order to get the thickness right for the other sides, you must remove exactly the thickness of wood that remains on the first pieces. Place the router on a piece of board. Sink the router until the bit just rests on the board and lock it in place. Place the tongue you have just cut on top of the depth stop, and slide the depth pin down to rest on it. Lock the pin in place. You can now unlock the plunge on the router and reset it to the pin.
Routers may be noisy, dusty, dangerous things that can ruin a piece of wood in an instant, and ruin whatever flesh gets to near the whirring bit in less time still, but they do make life quick and easy.
Wear a dust mask and eye protection. Really Do.
Finding my collection of power tools expanding beyond the space to store them in my back yard shed, I was faced with obtaining a half height tool shed to place in some space under the kitchen window. Unable to find one to suit, I thought – I’ll build one.
In making the frames I needed to cut some lap joints. Since I was working in rough treated timber, a rough lap joint was more than adequate, so out came the Black and Becker Router.
I set up a batten to guide the router on a scrap price, and this gave me a marker for how far from the batten the cut would be.
I set the router depth to approximately half the thickness of the wood, and a few moments later I had half the lap joints cut.

In order to get the thickness right for the other sides, you must remove exactly the thickness of wood that remains on the first pieces. Place the router on a piece of board. Sink the router until the bit just rests on the board and lock it in place. Place the tongue you have just cut on top of the depth stop, and slide the depth pin down to rest on it. Lock the pin in place. You can now unlock the plunge on the router and reset it to the pin.
Routers may be noisy, dusty, dangerous things that can ruin a piece of wood in an instant, and ruin whatever flesh gets to near the whirring bit in less time still, but they do make life quick and easy.
Wear a dust mask and eye protection. Really Do.
Friday, December 29, 2006
Planing square
 Ever try to square a side of a board with a plane. It can be a bit more difficult that it looks.
If the board is off to one side, one thing that worked for me was to offset the blade of the plane. (Please forgive the block diagram). Now the plane will take off more on one side than the other. This let me take off the the bulk of the material quickly.
Don't forget to reset your blade to square as you finish off the job.
Sunday, December 24, 2006
New Planes

Christmas brought some new planes. Wooden ones from Rutlands. The Jointer plane blade doesn't sit quite right. One side of the blade is lower than the other and no amount of pushing the top of the blade left or right will fix it. I suspect that the throat is not square with the base of the plane.
Since the plane is made of wood, a few minutes with a file should fix that.
The blades will need a little work to sharpen them up, a sheet of glass and some carbide paper is your only man for the job : ScarySharp.
Yep. I know that I opened them early, but that's a traddition in this house that goes back hours.
Tuesday, December 05, 2006
Fuller Stepped Drill Bits

Today I had cause to try out my Fuller stepped drill bits. I won't repeat my earlier post, and I have not got a cut through photo to post yet, but they do make life so easy. The drill bits come for different lengths screws, so for any one drill bit, the length of the narrowest part of the drill, ie for the pilot hole, is fixed.
But the length of the shank and the depth of the counter sink can be set so easily. This means that you can set the depth that you want to countersink the screws to exactly, just under the surface, or deep enough to plug.
Drill one hole and then pop in the screw, no trying to drill two concentric holes and a countersink.
They are not what you would call cheap, but given that I have about 1000 bronze screws which all need predrilling, that equates to a whole lot of saved time. Even if I figure that time saved at minimum wage, I think I'm well in the black.
Sunday, November 26, 2006
A new frame...
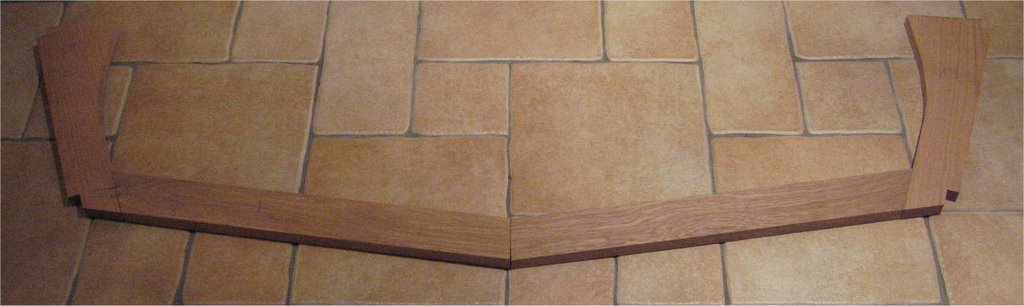
This weekend I tried a simpler frame. Frame 1 has no bevels pre-cut. If you look closely, you will see that the two bottom parts have not been fitted correctly at the center yet. That's another days work. By the way, sorry about the quality of the photo, my sis has borrowed my DSLR for a trip to South Africa, so I took this with an Ixus. Nice Camera for snapshots, but you can hardly set up remote triggered flashes. I'll retake it with a more contrasting background when I get my camera back.

This time I cut the joints away from the mark and fitted them with a Stanley Bailey Block Plane. Using the ScarySharp method for sharpening; progressively finer silicon carbide papers and a glass plate.
I was able shave paper thin slivers from the end grain of an Oak Plank. Then suddenly as if by magic (well with a little bit of work), bits that are supposed to fit together do.
I have still to "fit" the join at the center, but I need to draw the frame out on a large plywood board to ensure I have the angles right.
Monday, November 13, 2006
Credit where credit is due
A while back I bought two saw blades for my circular saw from www.Tools4trade.com. They sat on a shelf for a few weeks while I did other stuff. This weekend I was just about to put the first one in my saw when I realised that I had bought the wrong size.
I sent them an email asking if I could exchange them, and got back an email to the effect of "no problem, send us the blades and let us know what you need".
Wouldn't it be nice if everyone was this great.
I sent them an email asking if I could exchange them, and got back an email to the effect of "no problem, send us the blades and let us know what you need".
Wouldn't it be nice if everyone was this great.
Wednesday, October 25, 2006
Chisels and Planes
You could spend a LOT of money on these, I went with Marples Chisels and the more expensive Stanley planes. Then I spent a little time trying to sharpen them, and I found ScarySharp on the internet. Cheap, Simple, Effective, and it's easy even for a novice.
I'll let you know how the Marples and the Stanleys holds up. I can see a power plane in my future for fairing the frame of the boat. Doing that by hand could be a LOT of work.
I'll let you know how the Marples and the Stanleys holds up. I can see a power plane in my future for fairing the frame of the boat. Doing that by hand could be a LOT of work.
Subscribe to:
Posts (Atom)