Monday, January 29, 2007

A table saw

I started out trying to mount my circular saw upside down to a piece of plywood. That has a few problems.
  • No mitre slot
  • No parallel guide - you can clamp a piece of wood in place, but that's fiddly
  • No blade guard - That's a biggy. I'm fond of each and every one of my fingers..
Either you mount the blade through the plywood, so the guard is always open, or you mount the base plate of the saw through the ply wood, but then the spring loaded guide tries to lift your work piece. No fun.

Given that you can buy a cheap circular saw for about €150 it makes little sense to try to save money this way. Sure it will have limitations, it's not a precision high end machine, but neither is your circular saw mounted through plywood.


I eventually settled on the SIP 01321 for €150 form McQullians in Dublin (no web site). The one I bought comes without a stand.

So far I have simply assembled it, but there is one or two things to be aware of.

Adjusting the blade to make it parallel to the mitre slot
The saw is held in place by 4 bolts. You loosen these, with a socket wrench, it's inaccessible for spanners, and then you move the blade, and then you tighten them. It's very hit and miss. I was expecting some manner of screws or micro adjuster. But then this is a €150 saw.

The mitre guide is a little sloppy
You can move it about 1/2 a degree either way. I see a few grub screws in it's future. Tap holes into the side of the mitre bar, place grub screws in, and adjust them to get a perfect fit for the mitre bar.

The Fence is not rigid.
The fence locks parallel to the mitre slots. This is GOOD. But a small amount of force can move the end of it up to 3/4 cm (1/3 of an inch). I imagine the simplest solution to this is to place a piece of wood perpendicular to the fence, and clamp it at the edge of the table.

The table is not flat.
If you place a straight edge across the table, there is light visible in the middle. Not a lot, but light none the less. I'm not sure how much trouble this will cause. I'll update this as I start using the saw.

The angle guide is a gross approximation
But I kind of expected that. It just means that I always need to check the actual angle of the blade, even for vertical. The stops for vertical and 45 degrees are too coarse to be useful.

Once I start cutting things, I'll post a little more about how many of these short comings are problems in real life and how many are just niggles.

D

Monday, January 22, 2007

It scrubs up well...

Ok, it's not shiny and polished, but then I don't really need to start a tool restoration hobby. I wanted a usable tool.

I took it apart, brused of the dirt with an old toothbrush, and soaked it in vinegar overnight.

A little more work with a toothbrush, some 320 grit carbide paper, and some machine oil, and voila:

I bought a new blade, as even after spending a half hour with 120 grit paper, I was making little impression on the back of the old blade. I could sharpen it enough to plane pine, but it was looking like a career to flatten the back properly so that I could get it scary sharp.

I priced a new one at about €85 + postage, so I guess this is a bargain.

The base is flat. Or at least, sufficiently flat that I cannot tell the difference.

Sunday, January 14, 2007

Some Old Planes.


I have been given a few old, once loved planes, that have spent a few uncared for years. They once belonged to my grandfather, a Carpenter of significant skill. Now they are badly rusted.

Believe it or not, the blades are still sharp enough to cut your hand on. Of the three planes, there is a stanley bailey ~5, #4 1/2 and a Record #4.
Since I have a Stanley Bailey #4, I am planning on restoring the #5.

It appears to have been welded together, I have no idea of it's history, but one have cleaned it up a little I will have some idea of how salvagable it is.

Fitting Joints.


Some people, through years of practice can cut a perfectly fitting joint with a back saw. I can't.

In order to fit a joint, a simple method is to mark out the joint on a flat sheet of plywood, and to set up the joint against the lines. This makes it easy to see if the joint fits, and if the joint angles are correct.

So as you can see here, the cut is neither square not a straight line.


This can of course be fixed quite easily with a small block plane. One thing to point out is that the more time that you spend sharpening a tool, the less time you spend cursing it later.


You should check the angle of the joint and check that it's square every few strokes of the plane. The light visible here shows that I still have a little work to go.


As you can see the joint fits a lot better after a little cleaning up.

Sunday, January 07, 2007

Maybe I'm learning..

Yesterday I cut Frame #2.

The bottom members are relatively easy as they are pretty much just 3" boards. Of course I managed to mess up the end of one of them. It's just not square. However this time I made the cut about 1/8" away from line so that I could tidy it up with a block plane afterwards. So now instead of moaning about ruining another board, I'm off to sharpen my planes.

Maybe, just maybe I'm learning.

Sunday, December 31, 2006

Read the plans CAREFULLY.


There's nothing quite like the realisation that the piece of wood you have spent so much time on is just plain wrong. You know the sort of thing, cutting two left hand side pieces.

The little section in marked in red in the bottom left is actually part of the side piece. I read the plans as if it were a chine, or longitudinal member. So now I have two side pieces which are each about an inch short.

Oh well. It's all learning and practice I suppose.

The plans for the boat come from Glen L.

Friday, December 29, 2006

Planing square

Ever try to square a side of a board with a plane. It can be a bit more difficult that it looks.

If the board is off to one side, one thing that worked for me was to offset the blade of the plane. (Please forgive the block diagram). Now the plane will take off more on one side than the other. This let me take off the the bulk of the material quickly.

Don't forget to reset your blade to square as you finish off the job.

Sunday, December 24, 2006

New Planes


Christmas brought some new planes. Wooden ones from Rutlands. The Jointer plane blade doesn't sit quite right. One side of the blade is lower than the other and no amount of pushing the top of the blade left or right will fix it. I suspect that the throat is not square with the base of the plane.

Since the plane is made of wood, a few minutes with a file should fix that.

The blades will need a little work to sharpen them up, a sheet of glass and some carbide paper is your only man for the job : ScarySharp.

Yep. I know that I opened them early, but that's a traddition in this house that goes back hours.

Sunday, December 17, 2006

A shim in time saves recutting.

When cutting this frame, I was a little careless with the jigsaw, and the angle of the blade wandered. At one end the cut was perpendicular to the face, at the other, the bevel was almost 15 degrees off square.

Since this piece will be supporting weight from above, and will be under compression, and will have some nice bronze screws through it holding it all together, I reckon shimming is the way to go.

A ScarySharp block plane (see previous post) makes short work of getting a really flat edge, square to the surface of the board.

The shim was cut with a circular saw with a fine cut blade (lots of teeth) and a parallel guide. Works wonders for cutting a narrow strip.

Since I'm using Balcotan PU, I can get a strong end grain to side grain glue joint. All I need is LOTS of clamping pressure.

None of my clamps were of any use in this, so I put a block of wood behind my shim, tied a cord tight around it and the notch in the far end of the frame piece (with a small piece of wood there to prevent marking) and twisted it very tight with a screw driver. This method has been in use for centuries. It's cheap and versatile.

The shim was glued in place oversize, and then I trimmed the ends to fit.

I think that this counts as a rescue.

Next I will try shimming the other frame piece that I messed up, but that will be more difficult as I want to just shim the damaged part, which means cutting a notch. The only downside of Balcotan PU, is that it's pretty intolerant of gaps.

Friday, December 15, 2006

Shimming it.

From my previous post on routers and tearout, you may remember that I kind of messed up a perfectly good frame piece.

I am thinking of Cutting off 1/8 inch and shimming it. Clamp and glue another peice to it and sand /plane it to size. If the glue is truely stronger than the wood, it should be fine. Since I'll be using Balcotan PU, the end grain joint should not matter. And there I think there will be screws in place to hold it all together anyway.


And one last peice of reason is that it should be under compression most of the time anyway.

This time I think I'll try it out on a peice of scrap first to see how it goes. It if works, then I may be able to do the same thing on one of the transom frame pieces that got cut a little short.

That piece is cut a little short at the top. Since that part will be under compression and out of sight, shimming may be the way to go.

- To err is human, to mess up in style you need power tools.

Monday, December 11, 2006

Keeping Nyala in Style

A book that I came across that you might like. Keeping Nyala in Style
It's the story of a couple who bought and restored an old wooden boat. It's written by the woman, to disabuse us of our stereotypes.
She details many of the things that she learned along the way, along with illustrations and photos, from fitting bulkheads to the curves of the hull to cutting the joints for the frames for cabinets and beds.
I've already used some of her ideas for building a wardrobe in the attic. Ok, so that's not boat building, but it's all practice.

Tuesday, December 05, 2006

Fuller Stepped Drill Bits


Today I had cause to try out my Fuller stepped drill bits. I won't repeat my earlier post, and I have not got a cut through photo to post yet, but they do make life so easy. The drill bits come for different lengths screws, so for any one drill bit, the length of the narrowest part of the drill, ie for the pilot hole, is fixed.

But the length of the shank and the depth of the counter sink can be set so easily. This means that you can set the depth that you want to countersink the screws to exactly, just under the surface, or deep enough to plug.

Drill one hole and then pop in the screw, no trying to drill two concentric holes and a countersink.

They are not what you would call cheap, but given that I have about 1000 bronze screws which all need predrilling, that equates to a whole lot of saved time. Even if I figure that time saved at minimum wage, I think I'm well in the black.

Sunday, December 03, 2006

Routers and Tearout

TEAROUT
And I really should have known better. Really. This is starting to read like a "Mistakes not to make when building a boat." - Actually I may use that as a title if I ever write a book. I certainly won't be short of material.

I forgot that Routers like to cut the grain, but they really like to lift the grain. So the bottom peice here has nice big lumps missing.

No TEAROUT
When you find that the direction of spin of the blade will lift the grain - see diagram opposite.


Flip the thing over so that the as the blade of the router rotates, it cuts the grain, rather than trying to lift it.

Of course the really annoying thing is that I knew this, I really did. In my hurry to finish the frame, I forgot. And then when cutting seemed not to be working quite right, rather than take five and put my brain back into gear, I pressed ahead and messed up.

The damage is done to the part of the frame that sits on the keel.


If you can't be a good example, be a dire warning.

Monday, November 27, 2006

Boats are easier than carpets.

I'm a software engineer by profession, not a carpenter. But that basically involves three skills.
  1. Break a problem into little problems.
  2. Solve little problems.
  3. Keep an eye on the big picture.
Anyone see a resemblance to boat building here.

In addition, I've done a lot around the house, like plumbing, tiling floors (the tiling you see in the background of some of my photos), showers, baths, putting down wooden floors. (All with the assistance of my beautiful wife).

Boats, wooden floors and tiling seem to have one thing in common, it's hard to mess it up at one fell swoop. Break a tile, cut another. Cut a frame wrong, cut it again. If you are prepared to redo, then you can do.

If, however, you mess up and persist in going in the wrong direction in spite of knowing that something's not right, then I suggest that you buy the more expensive life jacket

Somewhere in the middle are mistakes that can be shimmed. There's probably a lifetime's experience in figuring out what can be shimmed and what needs to be recut.

Carpets (and Lino) on the other hand are different. Cut them too short and they're pretty much ruined. one single mistake and you're toast.

Sunday, November 26, 2006

What I will do better next time.

You live and learn.
  • As I have said before, trying to cut the most complex frame first is a bad plan. But there are other things that can make life easier or more difficult.

  • Never assume planks are parallel. If you want to cut a 3" strip of Oak, don't use the far side of the plank for your cutting guide. Rough cut planks are NEVER perfectly parallel.

  • Cut long straight cuts with a circular saw, not a jig saw. Circular saws are made to cut straight lines.
  • Working out of doors is a Pain it the . You have the cold, the dark, you have to take everything out and put it away. And you can't work if it might rain. Don't underestimate how much extra time everything takes if you work out of doors in northern Europe in the winter.
  • Check the blade setting on your Jigsaw before you cut. Run it through a piece of scrap, take out a Square and make sure that it's cutting perpendicularly. It's a real pain to look at a frame you have just cut and realise that there's an unintentional bevel.


  • If you want to use a guide or a
    jig with a Jigsaw, use blades with a set to the teeth. Bosch's T144DP does the job nicely, and it cuts Oak just fine. Blades without a set to the teeth tend to follow the cut, not the guide.

A new frame...


This weekend I tried a simpler frame. Frame 1 has no bevels pre-cut. If you look closely, you will see that the two bottom parts have not been fitted correctly at the center yet. That's another days work. By the way, sorry about the quality of the photo, my sis has borrowed my DSLR for a trip to South Africa, so I took this with an Ixus. Nice Camera for snapshots, but you can hardly set up remote triggered flashes. I'll retake it with a more contrasting background when I get my camera back.


This time I cut the joints away from the mark and fitted them with a Stanley Bailey Block Plane. Using the ScarySharp method for sharpening; progressively finer silicon carbide papers and a glass plate.

I was able shave paper thin slivers from the end grain of an Oak Plank. Then suddenly as if by magic (well with a little bit of work), bits that are supposed to fit together do.

I have still to "fit" the join at the center, but I need to draw the frame out on a large plywood board to ensure I have the angles right.

Tuesday, November 21, 2006

Glue

Pretty much everything that seems simple is not. If it seems simple then you probably don't know enough about it. Take Glue for example. Put two bits of wood together, some glue in the middle and it sticks right. Well sort of.

It needs to be waterproof. So that means Resorcinol, Epoxy or Polyurethane adhesive.
  • Resorcinol needs to be cured at relatively high temperature, won't fill gaps and need high clamping pressure.
  • Epoxy fills gaps, but doesn't like the cold and there can be problems with gluing white oak.
  • Polyurethane will fill gaps to .3 mm (small, tiny really), requires clamping, but doesn't mind the cold. It has a long open time that's not dependent on temperature.
Given that most of my work will be out of doors in winter in Ireland, I've just gotten 1Kg of Balcotan Super Fibre to try out. My plan is to glue the boat with this, then by the time it comes to glassing the boat, it should be a little warmer, and I can use a low temp epoxy. It's never really hot here.

I'm still kind of up in the air about glassing the whole boat, or just taping the joints and glassing them. We'll see.

Saturday, November 18, 2006

The Bosche GST 135 BCE / 1590 EVSK


It's wonderful.

I could stop there, but, specifically,

The pendulum setting cuts through 1" oak planks as though they were soft pine. (Remember to turn down the pendulum if you are cutting curves.)

The base plate angle can be set without tools, and you can set it consistently to reproducible angles.

I think that the best all round blade that I have tried so far is the bosch T144DP. Since it has a set to it's teeth, it follows a jig well. It will also cut a bevel and cut curves. I think I'll order a few packs.

Incidently, I got it from The Tool Man in the UK. Ordered Monday, arrived Wednesday. Nice helpful people.

A simple Jig saw Jig


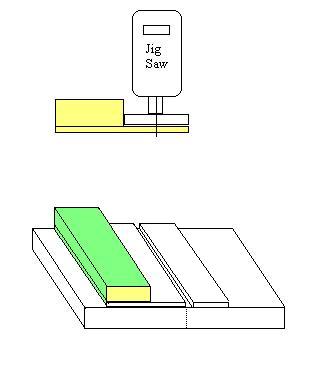
To cut a straight line with a jigsaw is remarkably easy. All you need is a simple jig made from a straight batten of wood, and a piece of 1/4" plywood.

First screw the plywood to the batten and counter sink the screws.

Clamp the batten down and saw along the batten as shown.

Place the plywood exactly along the line you wish to cut, and place a sceond scrap piece of the same plywood beside it to support the Jigsaw. Run the Jigsaw along the batten and it will cut your line exactly.

There are two caveats.

1) Always use it in the same direction, the distance from the side of the base plate of the jigsaw to the blade may be different on the left and right of the jigsaw.

2) If you want to cut a bevel, you need to make two jigs for each angle, one sloping away from the batten, the other sloping towards the batten.

Cutting Frames

Today I started actually cutting out frames and along the way I learned a few things.

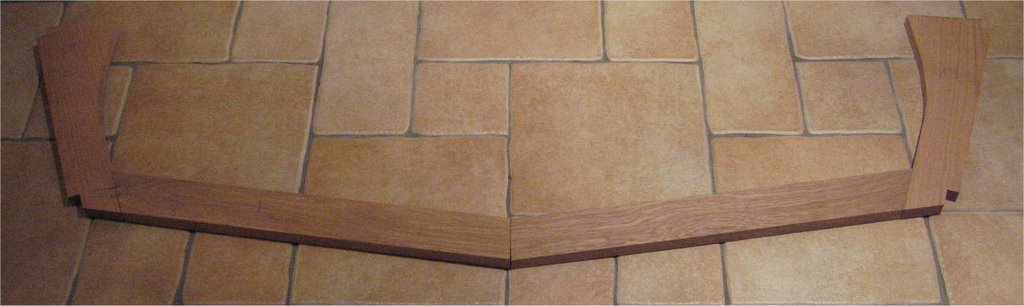
Firstly, don't try the transome frame first if the transom is angled. This frame will be bevelled and this complicates things a little. If you are still, like me, finding your footing, then this is the most difficult frame to cut and you should pick another to start on.

Secondly,

When you are cutting frames, cut the critical parts slightly long and plane or sand to fit. When you try to cut the notch for the keel shown here, cut it away from the lines you have marked so that there is extra wood. Then lay it out and see how it should fit together. You can easily plane or sand wood away, adding it back can be somewhat tricky.