Sunday, January 23, 2011

The Coamings


So I have started working on the Coamings. I can't claim the carving, I tried some smaller work, and it came out fine, but my practice pieces on larger letters were less consistent. So I sent the coaming to Wood Graphics Ireland who did a nice job.


Of course cutting to fit is a job and a half, since you have compound angles and a curve.


But I need to figure out how to join the ends

Sunday, January 16, 2011

Making More Cleats


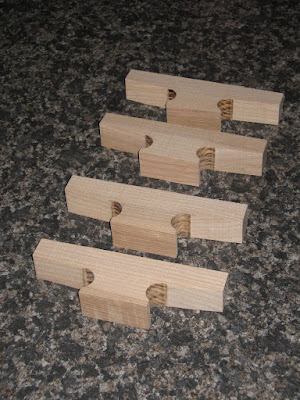
You can see the blanks here, the curves are cut on a drill stand with a 20mm Forstner bit. ThenI cut the horns before putting a 1/12 slope on each side. Of course, with my new found confidence, I made the base a little too short, but since they are for a 14' sailing dinghy, they should cope ok.


A rasp and a belt sander clamped upside down on a table with an 80 grit belt will do most of the shaping, and then you cut strips of a sanding belt and do the insides of the curve shoe shiner fashion.
Posted by Picasa

Friday, January 14, 2011

Making Cleats


Ok, so it took about 2 hours to make this, and it turned out a little thin on top. But since it's only going to hold the centerboard pennant, it should be fine.

Now that I have an Idea what I am doing, I think I will be able to churn one out in about 15 minutes.


  • A simple guide on the drill press means I can cut the holes for the curves without carefully measuring each block.
  • The order of cutting on the bandsaw is all important when some of the cuts are not at 90 degrees.
  • It's a lot easier to round the end of the cleat on a sander than on a bandsaw.
  • When you are joining a curve (20mm drill bit) and a straight line, don't try for a perfect tangent, cut inside the tangent, tidy up with sandpaper or a file.


It is still hard to explain why I spent all that time, instead of just buying a half a dozen nylon ones. At least it's hard to explain to some people.

Monday, January 03, 2011

The Drill bit

 
Posted by Picasa

One home made brazed drill bit. Not pretty, but it worked just fine.

Sunday, January 02, 2011

Tool Maker

All I needed was a 3/8" drill bit, about 2" long, and with a 1/4" hex fitting on the end. You see I could not get a drill in to the gap, so I'd have to use a ratchet with a hex drive.

No problem, I have lots of long drill bits, lots of screwdriver bits, a grinder with a cutting wheel, a Propane/Butane torch (1610ºc / 2930ºf), and some brazing wire.

I chopped the drill bit short, chopped off the end of the screwdriver bit, covered the joint in flux, and cooked it a little. The brazing wire melted and slurped into the joint just like in the videos on you-tube, and suddenly I had a 2" drill bit with a hex drive. Not the prettiest joint in the world, and I doubt it would hold up to much abuse, but it was good enough to drill a hole by hand.

10 minutes later, I had the hole sorted out in the Centerboard case for the pin. And after a little playing about, I had the Centerboard mounted.

Progress at last.