Tuesday, October 31, 2006

Stepped Drill Bits


To join two bits of wood with a Bronze Screw requires a lot more work than you might think. Bronze screws will not go into oak without the proper pilot hole.

Ideally you want a pilot hole, an shank hole and a countersink hole, which all have to be concentric.

Since the screw is free to turn in the top piece of wood, the screws pull the second piece of wood tight to the first in a way nails just can't.

Not wanting to drill three holes per screw, I searched the 'net and found Fuller. They produce an array of drill bits and other accessories, but of primary interest to me was the stepped drills.

Combine these with a countersink and a drill stop and you can in theory drink your three holes in one fell swoop.

As none of their distributors had the particular drills in stock that I needed, they kindly shipped the drills directly to me. The drills arrived promptly, in little envelopes, with each one coated in a plastic that peels off easily to protect them from damage in the post.

It will be a while before I get to the stage of screwing things together. I have to cut the frames first, but rest assured that I will post the results here. I may even go overboard and cut a hole in half to show a photo of a hole with a screw inserted.

Monday, October 30, 2006

Setting up the Planer

In order to start cutting the frames, I needed to turn sawn oak into planed oak. Time to break out the Woodstar PT 85.

First I had to replace the power plug. Annoying but trivial. The PT 85 is small enough to put on a standard Black and Decker WorkMate and there are holes in the base of the machine to clamp it down. (Do set it up along the length of the bench to give yourself a longer base.)

Then I ran a scrap piece of Oak over the planer. Very nice except for the ends which suffered horrible sniping. The result for the middle of the board was excellent.

Time to break out the articles from old woodwork magazines about setting up a planer.

The Woodstar is really quite simple to set up for planing. There are two settings

The infeed table
This is set up by twisting a knob at the end of the table which moves it up or down. Moving back down is by means of a spring, which tends to catch and then slip. So to get any sort of accuracy, bring the table lower than you need, and then adjust it back up.


The Cutter Blades
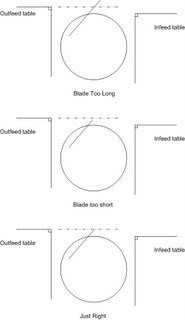
These are held in place by four allen bolts perpendicular to the blades. The are adjusted by two more allen bolts which are parallel to the blades. Here, the manual is less than helpful. What you need to do is to loosen the allen bolts holding the blade, and then adjust the blades so that they are exactly level with the outfeed table. then tighten the bolts. This is fiddly and time consuming, and will probably require a number of iterations. And each time you sharpen the blades, you need to re-adjust them.

In order to align the blades, get a straight edge and run it from the out feed table over the blades. Each blade should just touch the straight edge as you rotate it. See the diagram opposite. You may find a little bit of trial and error is required here. Patience and small adjustments is the key.

Take Good Care
There is a push stick provided. Use it. In spite of the gaurd, and through my own foolishness, my push stick already has a nice little notch in it. Had that been my fingers, typing would now be somewhat difficult.

Unfortunately about now, it started to rain, and since my "workshop" is out of doors, that necessitated a quick cover and tidy.

Next time, I'll play with the thicknessor function. I plan to thickness all the peices for a given frame in one session so that they are all done with the same machine setting.

So far I'm happy with the Woodstar.

Incidently I bought this in McQuillans Tools in Blanchardstown shopping center. They don't appear to have a web site, so I can't provide a link. If anyone has a link, stick a comment in and I'll add the link here.

Wednesday, October 25, 2006

Chisels and Planes

You could spend a LOT of money on these, I went with Marples Chisels and the more expensive Stanley planes. Then I spent a little time trying to sharpen them, and I found ScarySharp on the internet. Cheap, Simple, Effective, and it's easy even for a novice.

I'll let you know how the Marples and the Stanleys holds up. I can see a power plane in my future for fairing the frame of the boat. Doing that by hand could be a LOT of work.

Tuesday, October 24, 2006

The first problem....And Solution


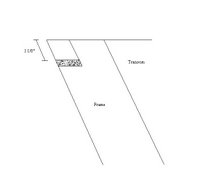
While tracing the Transom Frames, the notch for the sheer clamp is different to the rest. It's shown with a small shaded area, as shown here to the right.

On the glen l web site forums Graham Knight came up with the fact that the transom is angled, so the sheer clamp, while horizontal would not be perpendicular to the transom frame.

This makes it most likely that the plans are showing the slope of the notch by marking the front and back of the transom frame where they need to be cut.

Given that the remaining fames are vertical, and have no similar shaded area, I think that I am going to go with this. I may mock up a paper model to convince myself the angles are correct first though. Measure four or five times, cut once.

Power Tools

Some tools...

Planer Thicknesser
Since it's difficult to get planed oak here in Ireland. I am buying rough sawn planks. In order to plane and thicnkess these, I bought a Woodstar PT85 Planer / Thicknesser - Planer Thicknessers

It's still in it's box, but it looks like it will cope with the job, I'll update this as I start using it and let you know how it goes.

JigSaw
I have a Black and Decker 400 watt JigSaw, I am not sure how well this will cope with cutting 1 inch thick pine boards. I have my eye on a Bosch BCE 135, but we'll see how B&D copes first.

BandSaw
I cannot justify a band saw. And from what I have heard, I would probably be better off spending €200 on a good jigsaw rather than wasting €200 on a cheap band saw.

The Plans

Maybe I should go back a little.

The plans for the boat come from Glen L

They have a good selection of plans, a forum, and can supply most of the parts, fasteners, glues etc if you want. There are others who sell plans, but I liked the plans for the Glen l 14.

Since they are in the US and I am in Ireland, then I'll be buying parts and bits locally where possible.

I did buy the bronze screws from them since they have a nice kit that you can order, instead of having to source the various different screws locally. (Easier said than done.)

The Boat Begins

I have just started actually working on the boat. So far just tracing out the parts from the plans on to more manageable tracing sheets to transfer them to the oak.

I'm building a Glen L 14